Implementing Offensive Language Censorship in Your Chat Feature

In today’s digital landscape, user-to-user interaction is a core component of successful platforms. When you implement a real-time chat feature, you open a vital channel for community building. However, you also assume the responsibility of maintaining a safe, inclusive environment. Left unchecked, toxicity, profanity, and offensive language can quickly drive away valuable users and erode the trust in your product.
Censorship, in this context, is not about stifling conversation—it’s about protection and moderation.
This article will offer a use case for building real-time chat feature with censorship for offensive languages. I already have the existing code repository that built with React.JS and Nest.JS framework, but let’s build the chat feature from the beginning.
Building the Chat Feature
Of course, before adding the profanity filter feature, we need to build the chat feature first. And we will use WebSocket to build this chat feature.
Understanding the Data Schema
Let’s learn the system database schema first to make our learn process later easier.
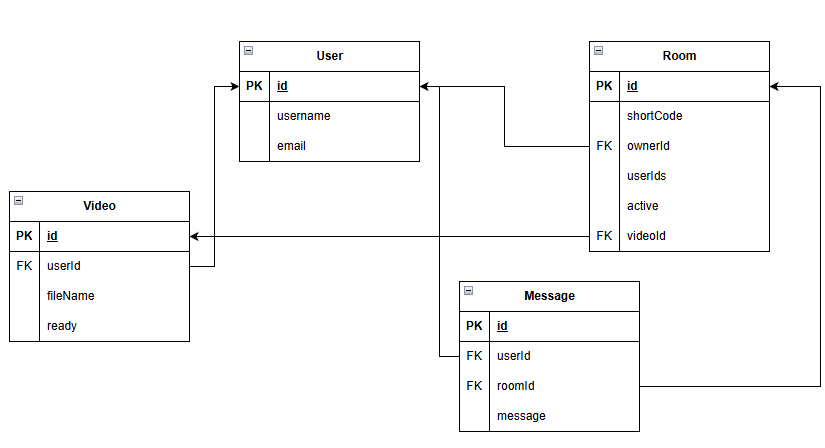
Our system is quite simple; we just have 4 entities: User, Room, Video, and Message. And for our chat features, we will only focus on 3 of them (User, Room, and Message).
Understanding the Flow of the Chat Feature
To make our process to create this chat feature easier, let’s write down the process of chat flow on our system.
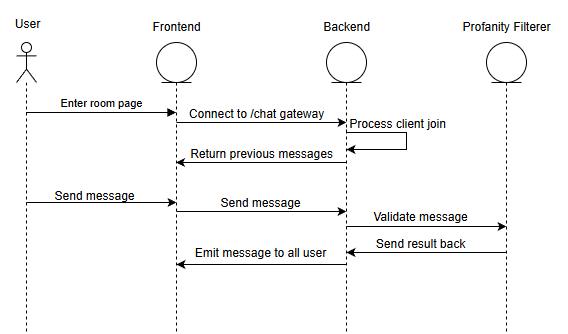
Like what we had seen in the diagram, the user has 2 main actions when interact with our chat feature.
The first one is when the user enters a room. The frontend initiate connection with backend through WebSocket. Then user will receive previous messages that sent in the room.
The second one is when the user send message. After frontend send the message to backend, the backend will be relaying the message to our Profanity Filter system (the system that filter hate speech, profanity language, etc. from our chat message). And after the message is checked, the result will be returned to our backend and then the message will be emitted to all the user of the room.
Create WebSocket Gateway for Chat
As the connector between frontend and backend, let’s create a WebSocket gateway first for this purpose. At the repository that I will share later, there’s file at path backend/src/gateways/chat.gateway.ts that contain the code for this gateway. And let’s quick check the code on that file.
.
.
.
@WebSocketGateway({ namespace: 'chat', cors: { origin: '*' } })
export class ChatGateway
  implements OnGatewayInit, OnGatewayConnection, OnGatewayDisconnect
{
  @WebSocketServer()
  server: Server;

  private readonly logger = new Logger(ChatGateway.name);

.
.
.

  @UseGuards(WsAuthGuard)
  @SubscribeMessage('joinRoom')
  async handleJoinRoom(
    @ConnectedSocket() client: Socket,
    @MessageBody() payload: JoinRoomPayload,
  ) {
    const { roomId } = payload;
    const userId = client.data.user.id;

    const hasAccess = await this.roomsService.checkUserAccessToRoom(
      roomId,
      userId,
    );
    if (!hasAccess) {
      this.logger.warn(`User ${userId} denied access to room ${roomId}`);
      client.emit('error', { message: 'Access to room denied.' });
      return;
    }

    await client.join(roomId);
    this.logger.log(
      `Client ${client.id} (user: ${userId}) joined room ${roomId}`,
    );

    const previousMessages = await this.messagesService.getMessage(roomId);
    client.emit('previousMessages', previousMessages);
  }

  @UseGuards(WsAuthGuard)
  @SubscribeMessage('chatMessage')
  async handleMessage(
    @ConnectedSocket() client: Socket,
    @MessageBody() payload: ChatMessagePayload,
  ) {
    const { roomId, message } = payload;
    const user = client.data.user;

    this.logger.log(
      `Received message from client ${client.id} in room ${roomId}: ${message}`,
    );

    if (!client.rooms.has(roomId)) {
      this.logger.warn(
        `User ${user.id} tried to send message to room ${roomId} without joining.`,
      );
      return;
    }

    const newMessage = await this.messagesService.createMessage(
      user.id,
      roomId,
      message,
    );

    this.server.to(roomId).emit('chatMessage', {
      sender: {
        id: user.id,
        username: user.username,
      },
      message: newMessage.text,
      createdAt: newMessage.createdAt,
    });
  }
}
The file contains two main functions: join room and send message. For join room function, the logic is quite clear, the user will be verified first, join the web socket network for the room, and then getting the previous messages.
For the send message function, it’s quite simple too. At first, we check if the room is valid, create the message for our database, and then emit the message to all the user on the room. And for our profanity filter feature, we will apply inside the command this.messagesService.createMessage . And let’s check that function out. That function placed on file with path /backend/src/services/messages.service.ts .
.
.
.
@Injectable()
export class MessagesService {
.
.
.

  async createMessage(
    userId: string,
    roomId: string,
    content: string,
  ): Promise<Message> {
    const detectionResult =
      await this.hateSpeechDetectorService.detect(content);

    const messageToSave = detectionResult.isHate ? '******' : content;

    const newMessage = this.messageRepository.create({
      userId,
      roomId,
      text: messageToSave,
    });

    const savedMessage = await this.messageRepository.save(newMessage);

    console.log(savedMessage);

    return savedMessage;
  }
.
.
.
}
We could see that the function will call the hateSpeechDetectorService.detect function first, that is our service that will check the message language, is it a proper language or not. And the rest of function is just deciding the message based on the profanity filter and save the message to the database.
And then to our final peek at our backend flow, let’s check the hateSpeechDetectorService.detect function. That function placed on file with path /backend/src/services/hate-speech-detector.service.ts .
export class HateSpeechDetectorService {
.
.
.
  public async detect(text: string): Promise<HateSpeechDetectionResult> {
    try {
      if (!this.apiUrl) {
        throw new Error('API URL is not set.');
      } else {
        const response = await axios.post<HateSpeechDetectionResult>(
          this.apiUrl + '/analyze',
          { text },
        );
        return response.data;
      }
    } catch (error) {
      console.error(
        'Error calling Hate Speech Detector API:',
        (error as AxiosError).message,
      );
      throw new Error('Failed to get hate speech detection result.');
    }
  }
}
This function will create an API call to our profanity filter service and then return the data.
After this, let’s check how our profanity filter service is built.
Create Profanity Checker Service
In this service, I’m using hate_speech_detector package for the detector. So, we will be utilizing this package for the core function of the service.
For the code, we can see file at file path hate-speech-detector/app.py for the /analyze endpoint
.
.
.
from hate_speech_detector import isHate
.
.
.
@app.route('/analyze', methods=['POST'])
def analyze_text():
    if not request.is_json:
        return jsonify({"error": "Request must be JSON"}), 400

    data = request.get_json()

    if 'text' not in data:
        return jsonify({"error": "Missing 'text' key in request body"}), 400

    text_to_analyze = data['text']

    if not isinstance(text_to_analyze, str):
        return jsonify({"error": "'text' must be a string"}), 400

    if not text_to_analyze.strip():
        return jsonify({"error": "'text' cannot be empty"}), 400

    try:
        results = isHate(text_to_analyze)

        return jsonify(results)

    except Exception as e:
        app.logger.error(f"An error occurred during prediction: {e}")
        return jsonify({"error": "An internal error occurred"}), 500
.
.
.
As we can see, we will use isHate function from hate_speech_detector package for analyze the text that we received at /analyze endpoint.
Create the Frontend Part
After finishing the WebSocket gateway at backend, let’s connect it with the frontend part so our user can use the feature.
Specifically, you can see ChatWindow component at file frontend/src/components/ChatWindow.tsx on frontend code. Mostly, the component will shape our frontend looks for the chat feature and give the user a way to send a message to the chat space.
.
.
.
import { useChat } from "../hooks/useChat";
.
.
.

const ChatWindow: React.FC<ChatWindowProps> = ({ roomId, onToggle }) => {
  const { messages, sendMessage } = useChat(
    import.meta.env.VITE_API_HOST,
    roomId
  );
.
.
.

  const handleSendMessage = useCallback(() => {
    if (inputRef.current && inputRef.current.value.trim()) {
      sendMessage(inputRef.current.value);
      if (inputRef.current) {
        inputRef.current.value = "";
      }
    }
  }, [sendMessage]);

.
.
.

export default ChatWindow;
We are using a hook named useChat that provide us with messages variable and sendMessage function. Well, the name of the variable and function is quite self-explanatory. And we will use the messages variable to render the messages on the chat space. And sendMessage will be used to send message from the user to our backend.
And let’s see how the useChat hook handle things.
.
.
.

export const useChat = (serverUrl: string, roomId: string | undefined) => {
  const [socket, setSocket] = useState<Socket | null>(null);
  const [messages, setMessages] = useState<ChatMessage[]>([]);
  const accessToken = getStoredAccessToken();

  useEffect(() => {
    if (!roomId) {
      setMessages([]);
      if (socket) {
        socket.disconnect();
        setSocket(null);
      }
      return;
    }

    const newSocket = io(`${serverUrl}/chat`, {
      auth: {
        token: accessToken,
      },
    });
    setSocket(newSocket);

    newSocket.on("connect", () => {
      console.log("Socket connected successfully, joining room:", roomId);
      newSocket.emit("joinRoom", { roomId });
    });

    newSocket.on("connect_error", (err: any) => {
      console.error("Socket connection failed:", err.message);
    });

    newSocket.on("previousMessages", (payload: BackendMessage[]) => {
      const formattedMessages: ChatMessage[] = payload.map((msg) => ({
        sender: {
          id: msg.user.id,
          username: msg.user.username,
        },
        message: msg.text,
        createdAt: msg.createdAt,
      }));
      setMessages(formattedMessages);
    });

    newSocket.on("chatMessage", (payload: ChatMessage) => {
      setMessages((prevMessages) => [...prevMessages, payload]);
    });

    newSocket.on("error", (error: any) => {
      console.error("Socket error:", error);
    });

    return () => {
      newSocket.disconnect();
    };
  }, [serverUrl, accessToken, roomId]);

  const sendMessage = useCallback(
    (message: string) => {
      if (socket && roomId) {
        socket.emit("chatMessage", { message, roomId });
      }
    },
    [socket, roomId]
  );

  return { messages, sendMessage };
};
As you can see, we will be doing some validation with our variable first. Then connect with the /chat WebSocket gateway. After we can be connected successfully, we will join the room. And we will be ready to receive some event from the WebSocket gateway like previousMessage , chatMessage , and error. Also there’s logic to send the user’s message to backend by emit chatMessage event with the socket.
Testing & Conclusion
Now let’s test our chat features. We will use 2 windows to show the communication that happened.
Like what we see at the demo, the functionality of the chat is already work quite well. We can send message at real-time also doing some profanity filtering along the way. Although there’s still few fixes that I need to do for the frontend of the component, but it already shows the big picture about how to create a chat feature with profanity filter.
Also, you can check the full codebase on this github link kuuhaku86/online-cinema: Online website to see movie with your friends realtime .
Leave a Reply