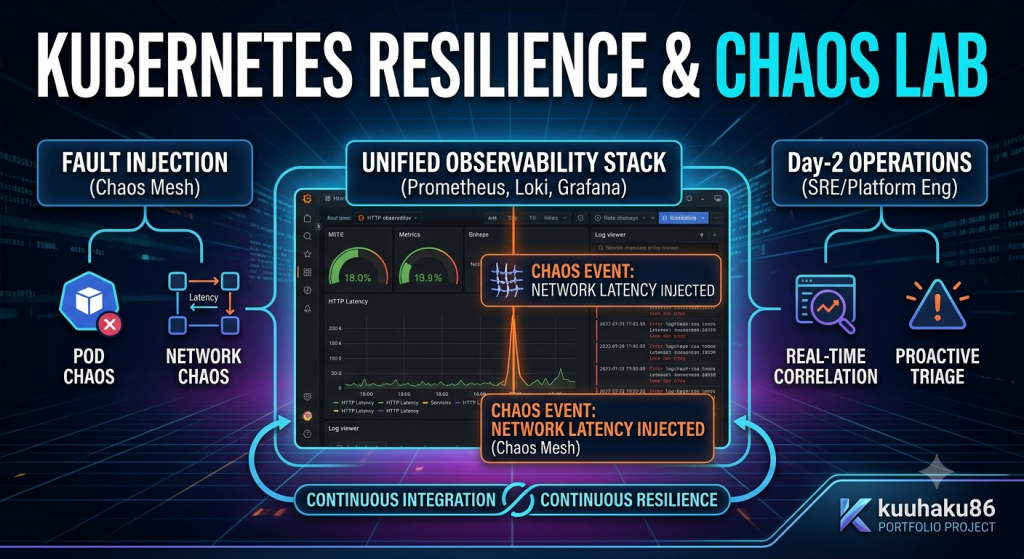
Nowadays, modern application architecture is become more and more complex. And this complexity will comes with some problems like high CPU usage, network degradation, and maybe some random pod that crashes on production environment. And usually we have our monitoring and alerting system that will make us aware about those problems. But we also need to check if our monitoring and alerting system is always reliable or not since waiting for an incident to occur before test your monitoring stack is a recipe for disaster.
Nowadays, multi-cloud strategies is becoming more popular (e.g., serving static frontend assets via Google Cloud Storage while running backend compute on AWS EC2). The cause can be because of wanting more redundancy, pricing options, or take advantage of the specified service that exist only on certain cloud provider.
To test multi-cloud infrastructure configuration, we usually need real cloud credentials, API keys, and there may be some spike on the cloud bills. So I think we need some alternatives to avoid us from these problems.
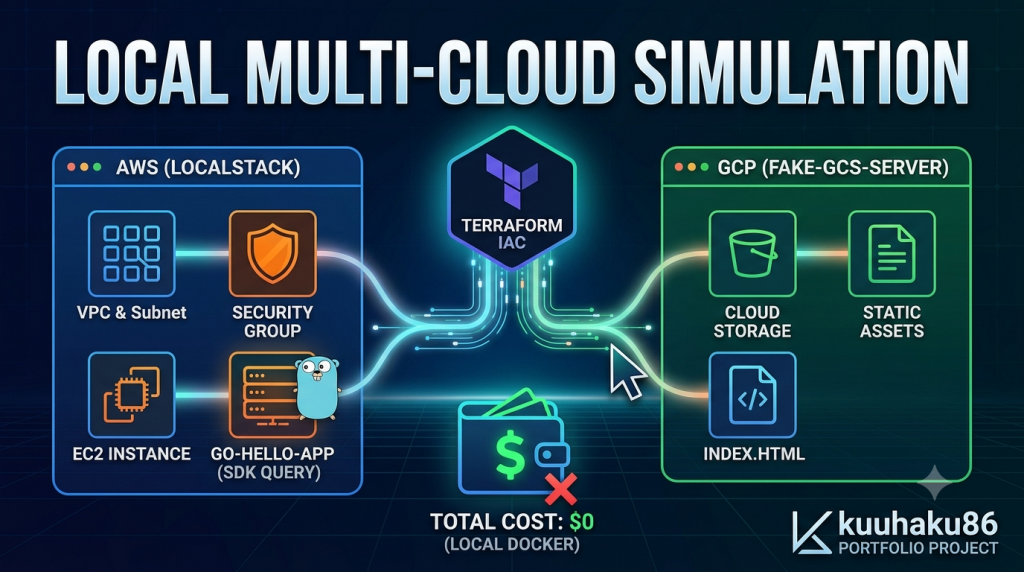
So I created a project that will not cost you anything, but you can run fully local multi-cloud environment on Docker. At this project, I will provision AWS network and compute resource and GCP storage bucket using standard Terraform, with LocalStack and fake-gcs-server emulating the cloud APIs.
The tech stack that we will use are Terraform >= 1.5, LocalStack (AWS EC2/VPC), fake-gcs-server (GCS), Go (aws-sdk-go-v2), and Docker Compose.
Architecture & The Request Flow
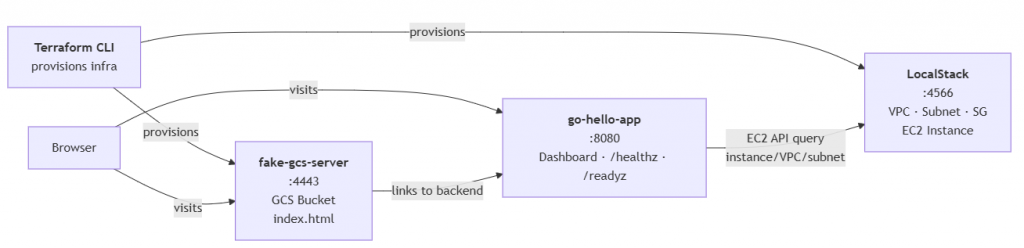
There will be three components that connected:
GCP Side (fake-gcs-server on :4443): Hosts a static index.html frontend in a simulated GCS bucket.
AWS Side (LocalStack on :4566): Emulates VPC, Subnet, Security Groups, and EC2 instance provisioning.
Backend Application (go-hello-app on :8080): A custom Go microservice with dashboard rendering, /healthz, and /readyz probes.
And, because this project is mostly simulation, how it works maybe quite different than the real cloud provider. I will explain what will happened when the user opens this project on their browser:
The static frontend loads from “GCP” The browser requests http://localhost:4443/storage/v1/b/multi-cloud-frontend-assets/o/index.html?alt=media. Even though this looks like a real Google Cloud Storage object URL, the request never leaves your machine, it still lands on fake-gcs-server, a Docker container emulating the GCS API. It returns a static HTML page with an architecture overview and a button labeled “Open Backend Dashboard”.
The browser follows the link to the backend Clicking that button will navigates the browser to http://localhost:8080/. This is a separate Docker container running a Go binary, the same binary you’d deploy on a real EC2 instance. The Go app handles the / route by rendering an HTML dashboard.
The Go app asks AWS: “Who am I?” Before writing a single byte of HTML, the Go handler calls DescribeInstances against http://localstack:4566, it’s the LocalStack container that emulating the AWS EC2 API. It sends a request identical to what a production app would send to ec2.amazonaws.com, but directed at the LocalStack container on the same Docker network.
LocalStack answers with metadata LocalStack replies with the instance it knows about (the mock EC2 instance Terraform created earlier): an instance ID like i-abc123, a VPC ID like vpc-def456, and a subnet ID like subnet-ghi789. Same JSON structure as real AWS.
The dashboard renders The Go handler construct those EC2 values into the HTML table alongside the existing fields: environment, hostname, version, Go version, server time. The result is a dashboard that reads like any other cloud-hosted app.
What happens if LocalStack isn’t ready? The Go handler wraps the EC2 call in a 2-second timeout. So, if LocalStack hasn’t booted, or if Terraform hasn’t created any instances yet, the query fails gracefully, instanceID, vpcID, and subnetID all fall back to “N/A”. The dashboard still renders, just without EC2 metadata.
Overriding Cloud Providers in Terraform
The entire project is depend on providers.tf line 34. Here’s how it works.
Usually the AWS provider calls ec2.us-east-1.amazonaws.com. The endpoints block overrides this, every EC2 API call (CreateVpc, DescribeInstances, etc.) now goes to localhost:4566 instead. LocalStack receives these standard AWS API requests and will responds with real-looking JSON. But only ec2 is overridden. Other AWS services (S3, Lambda, RDS) still point to their real endpoints by default. We’re only emulating what we need.
GCP doesn’t have a generic endpoints block like AWS. Instead, each service has its own override. storage_custom_endpoint redirects all GCS operations: CreateBucket, InsertObject, GetObject that will points to localhost:4443/storage/v1/, where fake-gcs-server is listening.
Bypassing Authentication (Without a Single Credential)
This is where most local cloud demos failed. Real AWS and GCP providers both demand credentials. In production, that means IAM access keys or OAuth tokens. But we’re not communicate with real cloud providers and our emulators don’t validate a thing.
AWS side, three flags disable every auth check:
skip_credentials_validation = true   # don't check if access_key is valid
skip_metadata_api_check     = true   # don't try the EC2 metadata service
skip_requesting_account_id  = true   # don't call sts:GetCallerIdentity
The access_key and secret_key values ("mock_access_key", "mock_secret_key") are literal dummy data, they could be any string. LocalStack simply doesn’t validate them. Without these three skip_* flags, the AWS provider would try to call the real AWS STS endpoint to verify the keys and fail immediately.
GCP side, even simpler:
access_token = "mock_access_token"
In a real GCP setup, terraform apply triggers an OAuth2 browser flow to get a valid token. By passing a dummy string directly as access_token, we skip OAuth entirely. The string "mock_access_token" is complete fake data, and fake-gcs-server accepts any token without inspection.
What This Enables
The same providers.tf file, with different endpoint values, would provision real infrastructure. You just need to swap localhost:4566 for the real EC2 endpoint, use actual IAM credentials, remove the skip_* flags and then your local simulation becomes a production deployment. The modules, the variables, the resource definitions, nothing else need to be changed.
This is the core value proposition: develop locally against emulators, then deploy to real clouds by changing endpoints and credentials alone. No code rewrites, no environment-specific branches, no mock-vs-real if statements scattered through your infrastructure code.
Dynamic Metadata Discovery via Go
In production, apps on EC2 don’t know their own instance ID. Instead, they call the Instance Metadata Service (IMDS) at http://169.254.169.254/latest/meta-data/ , it’s a local HTTP endpoint that returns instance ID, VPC, subnet, IAM role, and more. This is how every AWS-native app bootstraps itself.
LocalStack doesn’t emulate IMDS. So we need to be creative: the Go app calls the EC2 API directly.
The BaseEndpoint override will redirects every SDK call from ec2.amazonaws.com to the LocalStack container on the Docker network, the same trick Terraform uses in providers.tf. Mock credentials ("test" / "test") to satisfy the SDK config loader; LocalStack itself never validates them.
On each dashboard request, the handler calls DescribeInstances:
ctx, cancel := context.WithTimeout(ctx, 2*time.Second)
defer cancel()

result, err := ec2Client.DescribeInstances(ctx, &ec2.DescribeInstancesInput{})
if err != nil {
    return  // all fields remain "N/A"
}
// Walk Reservations[0].Instances[0] for InstanceId, VpcId, SubnetId
The 2-second timeout is the safety net. If LocalStack hasn’t booted yet, or Terraform hasn’t created any instances yet, the query fails and all three EC2 fields will gracefully show "N/A" value. The rest of the dashboard (environment, hostname, version, uptime) still renders normally.
Why this mirrors production: The code path is identical. Swap BaseEndpoint from localstack:4566 to the real EC2 endpoint, use real IAM credentials, and the exact same binary queries the real AWS, finds the actual instance it’s running on, and displays real metadata. No if LOCAL branches, no mock flags, no code changes. Just one endpoint swap away from production.
Developer Experience & Makefile Orchestration
Three Docker containers, two cloud providers, one Terraform state. It sounds complex, but let’s check the Makefile:
The full workflow fits in four commands that anyone can run:
make up        # starts LocalStack, fake-gcs-server, and the Go app
make init      # downloads Terraform providers
make apply     # provisions VPC, subnet, SG, EC2 instance, GCS bucket
make status    # health-checks all three services
make up have something extra, after starting Docker, it will waits 3 seconds then pings :8080/healthz. If the backend responds, it prints “Backend ready.” . If not, “Warning: Backend not responding”. It gives the user immediate feedback before they even run Terraform.
make status is the verify command. It doesn’t just list running containers, it will curls each service’s health endpoint and prints the raw JSON responses:
=== Docker containers ===
NAME                          STATUS
terraform-multicloud-web-backend-1       Up
terraform-multicloud-web-localstack-1    Up
terraform-multicloud-web-gcs-emulator-1  Up

=== LocalStack health ===
{"services": {"ec2": "available", "vpc": "available"}}

=== Backend health ===
{"status":"ok"}
One command proves all three components are alive. No browser needed. New contributors can run make status in a terminal and instantly see whether the entire stack is healthy.
Terraform commands mirror the same pattern, make plan (preview changes), make destroy (tear down), make clean (nuke everything: containers, volumes, state, lock files).
The Makefile does nothing special. It’s just wrapping docker compose and terraform commands behind short, memorable names. But that is the point, when a project reduces a multi-cloud simulation to four words, you can prevent it to being intimidating and starts being a tool people actually want to try.
Conclusion
This project solves something that linger in my mind for a long time: how do you practice multi-cloud infrastructure-as-code without an AWS and a GCP bills?
The answer turned out to be something that surprisingly simple. Two Docker containers emulate two clouds. One Terraform codebase provisions both simultaneously by overriding provider endpoints. One Go binary queries the simulated EC2 API at runtime, just like a real app would do. And a Makefile glues it all together into four commands anyone can run in under a minute.
What this gives you:
A zero-cost playground for multi-cloud Terraform modules, provider overrides, and state management.
A real SDK integration, not a mock, not an if LOCAL branch, but the same aws-sdk-go-v2 calls a production app would make.
A reproducible dev environment — make clean && make up && make apply resets everything to a known state
Nowadays, there’s common practice to divide the environment of our application into production and staging. This practice intended to create a safe environment for testing the application before we deploy the application to production and then used by the real user.
So, the engineer need to be able deploy the application into these different environment separately. So, we need to do practice for this purpose. But if we trying to do this on a cloud provider like AWS or GCP, it’s a sure thing that the cost will drain your wallet.
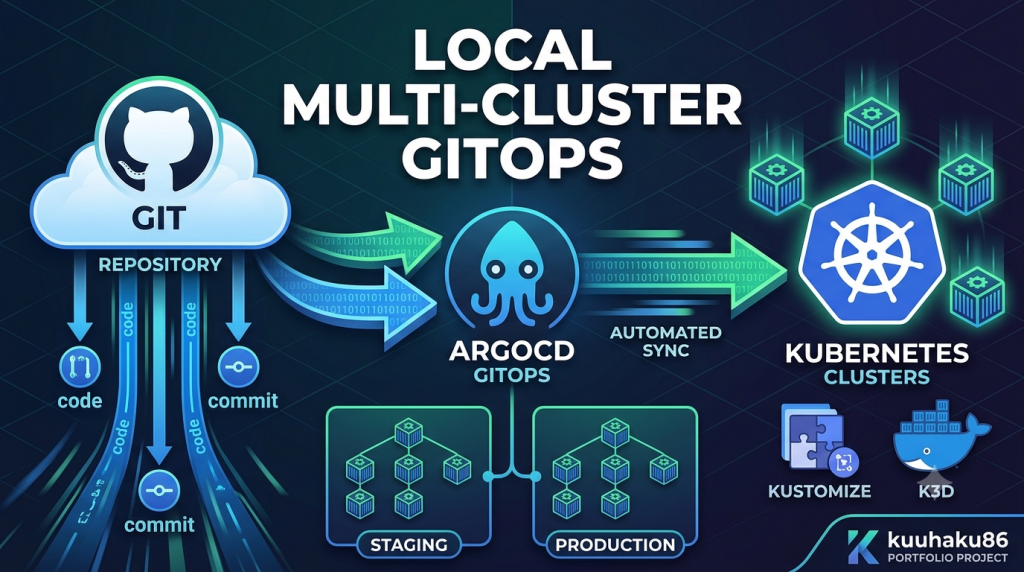
In this post, I will share a cost-effective solution for this problem. We will deploy a enterprise-grade Hub-and-Spoke GitOps environment inside a single local Virtual Machine. And it will completely for free.
This time, we will use Kubernetes as our main orchestrator for the application. We will use k3d to emulate the Kubernetes, ArgoCD as the CD (Continous Deployment) tool and GitHub as our project repository.
In today’s digital landscape, user-to-user interaction is a core component of successful platforms. When you implement a real-time chat feature, you open a vital channel for community building. However, you also assume the responsibility of maintaining a safe, inclusive environment. Left unchecked, toxicity, profanity, and offensive language can quickly drive away valuable users and erode the trust in your product.
Censorship, in this context, is not about stifling conversation—it’s about protection and moderation.
This article will offer a use case for building real-time chat feature with censorship for offensive languages. I already have the existing code repository that built with React.JS and Nest.JS framework, but let’s build the chat feature from the beginning.